I chose to migrate to the Astro.build Web Framework because of its awesome Documentation, it’s large active community, the large number of themes to choose from and the really nice developer experience, especially with Astro’s latest v4 release.
Pre-Flight Checks:
- Cheap - check!
- Fast - check!
- Secure - check!
Let’s go ahead and build it!
I have defined the whole architecture as code for AWS Cloud(Terraform, Cloudformation, CDK etc..), here is the AWS architecture diagram on how it’s all pieced together:
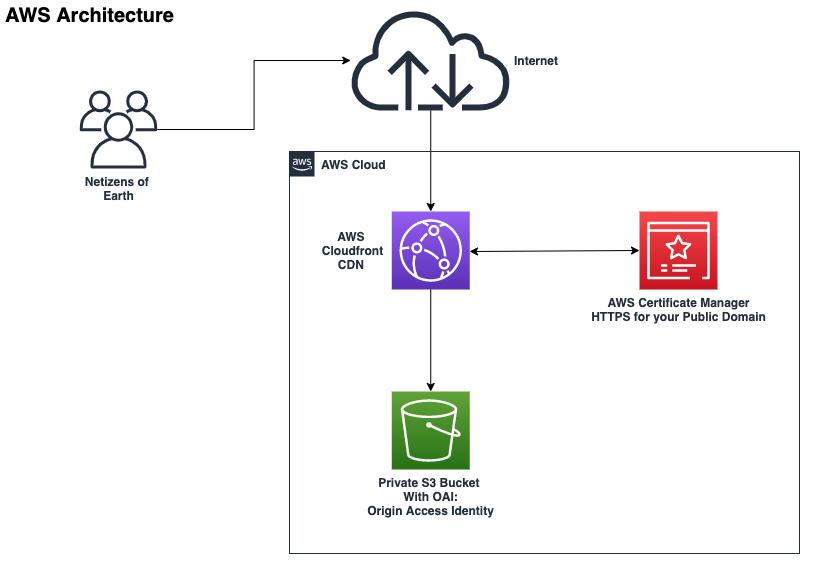
We are essentially using Cloudfront to serve our Astro static site content from a Private S3 bucket within our AWS account, which in cloudfront lingo translates to an S3 Origin configuration. The S3 bucket does not have Website enabled and is using OAI - Origin Access Identity, which is a Cloudfront user that has access to view s3 bucket content internally. Doing it this way means that the public will only ever access the cached content provided by Cloudfront to an edge location close to the user and keeping the AWS S3 bucket private.
Domain Registration and Certficate Management for SSL/TLS
In my case I already had a domain registered with a registrar external to AWS (otherwise you can use Route53 to register your new domain). In order to obtain a Certificate for my externally registered domain, I used AWS Certficate Manager(ACM). All I had to do was request a public certicate from ACM, which gave me the choice to validate this with my domain via DNS or Email, I opted for the DNS method. You can read about the process here –> Request a Public Certificate. You then just use the Certificate ARN generated in your Cloudfront configuration.
AWS Cloudfront Function Needed
Unfortunately (or it could be just me), but CloudFront does not support multi-page sub-folder/index routing by default. To configure it, we will use CloudFront Functions to point the request to the desired object in S3.
Create a new CloudFront function with the following code snippet.
You can find CloudFront functions in AWS Console: CloudFront > Functions, I would recommened that you add it to infrastructure-as-code template.
function handler(event) {
  var request = event.request;
  var uri = request.uri;

  // Check whether the URI is missing a file name.
  if (uri.endsWith("/")) {
    request.uri += "index.html";
  }
  // Check whether the URI is missing a file extension.
  else if (!uri.includes(".")) {
    request.uri += "/index.html";
  }

  return request;
}
CI/CD Infrastructure and Content Automation
To build the infrastructure and automate the deployment of your Blog content, choose your infrastructure-as-code poison and automate the CI/CD pipeline with Github and Github Actions.
- AWS Infrastructure deployment updates/changes is triggered(Github Actions) by a commit to the Github Main branch, so very low churn if any after initial launch of the AWS infrastructure
- Authentication between Github and AWS is via OpenID Connect, HERE is the documentation on how to configure OpenID Connect with AWS. Doing it this way means that you don’t have to manage AWS Keys and Secrets for IAM users, you just have to be very explicit for the permissions you assign to the to role you use with OpenID Connect(Adopt Principal of Least Privileges), or use multi-account setups and assume roles.
Integration of Github Discussions and Giscus
Out of the box, the Astro Static Site framework does not natively have the capability to allow commenting on Blog posts you publish. So in order to keep the blog site as a static website for your blog content with a CDN(Content Delivery Network), you can integrate Github Discussions with the Giscus App. Here are the basic steps on getting it setup;
- Create a new public Github Repo solely just for Comments
- Enable Discussions in the public Github Repo you just created
- Within Github Discussions, Create a new Category called “Blog Post Comments”
- Goto Giscus App website Here to generate your config code snippet
- Fill in the form to auto generate a block of code to add as a component into Astro src/components
- Update PostDetails.astro Layout section and import the new postComments component.
- This dude documents the process nicely Add Comments to Astro Blog
You can now chat to yourself on the Blog posts you publish :-)
Authoring and Publishing New Content
During the manifestation of your brain fart into text, you can launch a dev server by running the command npm run dev which will launch a localhost web server url for you to preview your content locally first. After we are done with authoring our new blog post content we want to publish, The following workflow is actioned:
- Submit a PR to yourself
- Review and Nitpick the PR
- Approve and merge it into main branch
- Github Actions workflow is triggered:
- Builds Application:
npm run build - Syncs ./dist folder with aws s3 bucket:
aws s3 sync --delete ./dist s3://${{ secrets.BUCKET_ID}} - Updates AWS Cloudfront distribution:
aws cloudfront create-invalidation -distribution-id ${{ secrets.DISTRIBUTION_ID }} --paths "/*"
- Builds Application:
No more server maintenance or administration.. It’s Serverless with just the right amount of grunt without needing to eat your weeties or a fat wallet.