What we have here is an alternative to Kubernetes without the unruly Spaghetti… I found the following implementation of a Hashicorp Nomad/Consul cluster a refreshing and simple design that can run services/applications in a stateful, highly-available configuration with service discovery and load-balancing that is not complex, so you can spend more time on core business application development rather than infrastructure or platform engineering.
I personally have deployed this on my home lab and used my UnRAID server as both the NFS Server and Hypervisor for the cluster nodes.
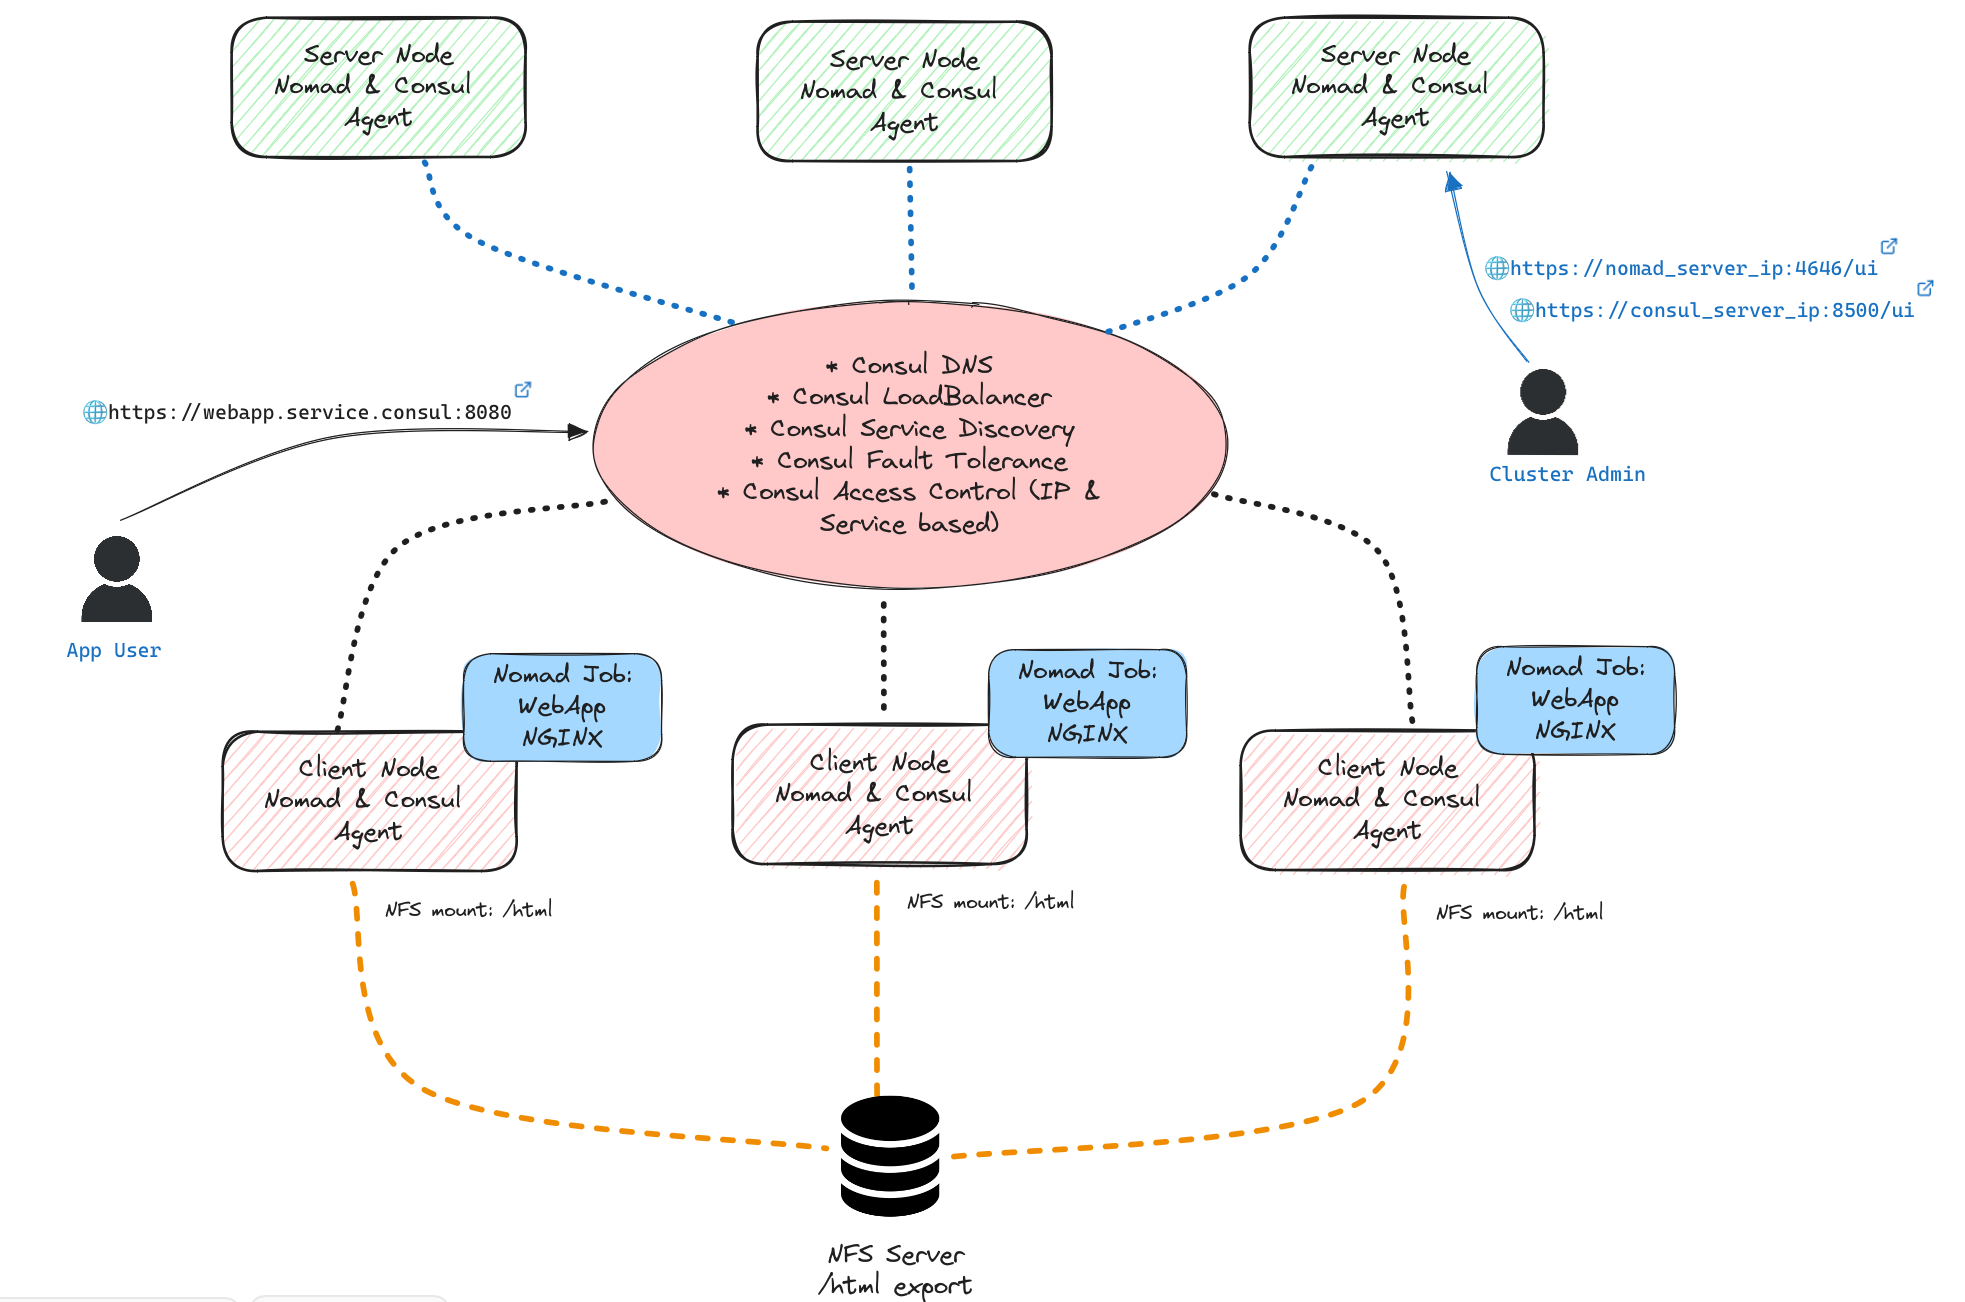
The diagram below is a logical representation of our base Nomad/Consul cluster. It depicts how we deploy 1 web application/service(Nginx) running in a Docker container, orchestrated by Nomad, across 3 client Nomad Agents to give us the redundancy across 3 physical or virtual client/worker nodes. The Nginx html content is served from an NFS Server whilst Service Discovery, Fault Tolerance/Health Checks, Load Balancing and Access Control(IP, Service) is provided by Consul with minimal configuration needed, which equals less head-aches! yay! Mitch Hashimoto explains it very nicely Here.. So we are here today to figure out how to actually implement this architecture.
Setting up the Hashicorp Server and Client Nodes
First we start with deploying 6 VM’s with Rocky Linux 9.4 Base Operating System(minimal ISO version). The 3 server nodes and the 3 client nodes will have the same Base OS configuration. The Client and Server agent configurations are setup in Consul/Nomad configuration files.
The recommended specifications for the Server nodes are documented on Hashicorp’s Reference Architecture site Here, my homelab is running the following spec;
- 3 x Server Nodes spec(home lab): 1 CPU, 4GB RAM
- 3 x Client Node spec(home lab): 2 CPU, 4GB RAM
Installing Rocky Linux 9.4 (repeat for all 6 VM’s/nodes)
Upon installing the base Rocky Linux 9.4 operating system(from Rocky’s minimal-iso image) with your localised environment configuration, run the following steps;
- Update Rocky Linux OS
sudo dnf update- Add Hashicorp Repo
sudo dnf install -y dnf-plugins-core
sudo wget -O- https://rpm.releases.hashicorp.com/RHEL/hashicorp.repo | sudo tee /etc/yum.repos.d/hashicorp.repo
sudo dnf update- Install Hashicorp Nomad and Consul packages
sudo dnf install -y nomad-1.8.1-1.x86_64 consul-1.19.1-1.x86_64If you want to upgrade nomad version to a newer version just run the same command on a running system and restart the nomad service. ;
sudo dnf install nomad-1.9.0-1.x86_64
sudo systemctl restart nomad
To check what versions are available from the Hashicorp Repo, run the following command;
sudo dnf list --showduplicates | grep hashicorp- Install CNI (Container Network Interface)
sudo dnf install -y tar

curl -L -o cni-plugins.tgz "https://github.com/containernetworking/plugins/releases/download/v1.0.0/cni-plugins-linux-$( [ $(uname -m) = aarch64 ] && echo arm64 || echo amd64)"-v1.0.0.tgz && \
  sudo mkdir -p /opt/cni/bin && \
sudo tar -C /opt/cni/bin -xzf cni-plugins.tgz- Configure bridge network to route traffic through iptables, edit or create /etc/sysctl.d/bridge.conf and add the following lines to the bridge.conf file
net.bridge.bridge-nf-call-arptables = 1
net.bridge.bridge-nf-call-ip6tables = 1
net.bridge.bridge-nf-call-iptables = 1- SystemD Configuration
Applies to all Server and Client nodes, the client and server specfic configuration are done within the Nomad/Consul configuration files at /etc/nomad.d and /etc/consul.d
nomad.service
/etc/systemd/system/nomad.service
[Unit]
Description=Nomad
Documentation=https://www.nomadproject.io/docs/
Wants=network-online.target
After=network-online.target

[Service]
User=nomad
Group=nomad

ExecReload=/bin/kill -HUP $MAINPID
ExecStart=/usr/bin/nomad agent -config /etc/nomad.d
KillMode=process
KillSignal=SIGINT
LimitNOFILE=65536
LimitNPROC=infinity
Restart=on-failure
RestartSec=2

TasksMax=infinity
OOMScoreAdjust=-1000

[Install]
WantedBy=multi-user.target
consul.service
/etc/systemd/system/consul.service
[Unit]
Description="HashiCorp Consul - A service mesh solution"
Documentation=https://www.consul.io/
Requires=network-online.target
After=network-online.target
ConditionFileNotEmpty=/etc/consul.d/consul.hcl

[Service]
EnvironmentFile=-/etc/consul.d/consul.env
User=consul
Group=consul
ExecStart=/usr/bin/consul agent -config-dir=/etc/consul.d/
ExecReload=/bin/kill --signal HUP $MAINPID
KillMode=process
KillSignal=SIGTERM
Restart=on-failure
LimitNOFILE=65536

[Install]
WantedBy=multi-user.target
Reload SystemD:
sudo systemctl daemon-reloadNomad/Consul Server and Client specific configurations
Once you have all 6 Nodes deployed, 3 x Server and 3 x Client, with the Nomad and Consul packages installed, we can now configure each node to the desired roles(server or client) in the cluster by editing the appropriate Nomad and Consul configuration files; /etc/nomad.d/ and /etc/consul.d/
We are following Hashicorp’s online Deployment Guide and Reference Architecture documentation to configure Nomad and Consul as per following diagram
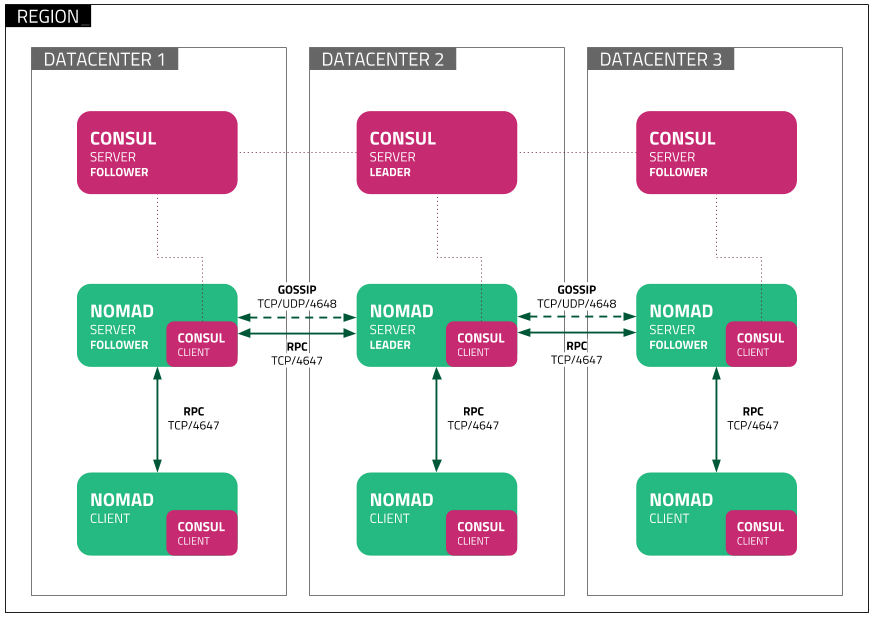
In the above diagram you will see that Nomad/Consul servers and clients are distributed across 3 datacentres, which on Cloud hyperscalers can mean 3 Availability Zones. As you scale up your production workloads, this would be the recommended architecture, but with the way hardware is modularised or hyper-converged these days, for smaller production workloads you can get away with having the Consul and Nomad server agents running on the same node, so instead of 6 servers(3 Nomad, 3 Consul), you can run the server agents across 3 nodes, and the client workloads on a minimum of 3 nodes, depending on how powerful your client nodes are will dictate how many you will need. It all comes down to your acceptable risk and availability requirements.
Consul/Nomad Client and Server Configuration
An important note to remember is that whatever datacentre name you decide to use, it must be the same across both Nomad and Consul server/client configurations.
Consul Server Configuration
- Edit /etc/consul.d/consul.hcl for the 3 Consul Server and 3 Client Nodes
datacenter = "my-datacentre-name"
data_dir = "/opt/consul"- Edit or Create /etc/consul.d/server.hcl for the 3 Consul Server Nodes
  server = true
  bootstrap_expect=3
  retry_join = ["SERVER_IP_1","SERVER_IP_2","SERVER_IP_3"]
  client_addr = "0.0.0.0"

  bind_addr = "0.0.0.0" # Listen on all IPv4

  connect {
  enabled = true
  }

  addresses {
  grpc = "127.0.0.1"
  }

  ports {
  grpc  = 8502
  }

  ui_config{
  enabled = true
  }
Consul Client Configuration
- Edit /etc/consul.d/consul.hcl (same across all Consul Server/Client Nodes)
datacenter = "my-datacentre-name"
data_dir = "/opt/consul"- Edit or Create /etc/consul.d/client.hcl for the 3 Consul Client Nodes
server = false
bind_addr = "0.0.0.0"
advertise_addr = "{{ GetInterfaceIP `enp1s0` }}"
retry_join = ["SERVER_IP_1","SERVER_IP_2","SERVER_IP_3"]
The advertise_addr config entry is needed for client nodes that have more than one network interface defined, keep in mind that Docker engine adds its own network interfaces. Consul needs to be told which network interface to bind the consul traffic to.
After Completing the Consul Server and Client configuration, you can now start the Consul SystemD Service. Start all servers first, followed by the clients:
sudo systemctl enable consul
sudo systemctl start consul
sudo systemctl status consul
If you have errors on starting the Consul service, you can get more information from the /var/log/messages file to help troubleshoot the cause.
Nomad Server Configuration
- Edit /etc/nomad.d/nomad.hcl (same across all Nomad Server/Client Nodes)
datacenter = "My-Datacentre-Name"
data_dir = "/opt/nomad/data"- Edit/Create /etc/nomad.d/server.hcl on the 3 Server nodes
server {
enabled = true
bootstrap_expect = 3

server_join {
  retry_join     = ["SERVER_IP_1", "SERVER_IP_2", "SERVIER_IP_3"]
  retry_max      = 3
  retry_interval = "15s"
 }
}- Server Firewall Configuration
Open the following ports for Nomad Servers:
- TCP-4646(WebUI, http://nomad-server-IP:4646/ui)
- TCP-4647(RPC Inter Server/Client Comms)
- TCP/UDP-4648(Serf WAN for Server Gossip Protocol)
Or if you want to test functionality of Nomad Server first, disable local Rocky Linux 9 firewall: > sudo systemctl disable firewalld. REMEMBER to re-enable Firewalld and only open the ports needed for Nomad and Consul on your firewalld config or Cloud security/firewall rules.
*** NOTE: By default Rocky 9 has firewalld enabled and running which blocks Nomad Ports.
- Start the Nomad Server Service on the 3 Server Nodes
sudo systemctl enable nomad
sudo systemctl start nomad
sudo systemctl status nomad
Nomad Client Configuration
- Install Docker Engine on the 3 Client nodes
sudo dnf config-manager --add-repo https://download.docker.com/linux/centos/docker-ce.repo
sudo dnf -y install docker-ce docker-ce-cli containerd.io
sudo systemctl --now enable docker
sudo systemctl start docker- Install NFS Utils on the 3 Client nodes
sudo dnf install -y nfs-utils.x86_64- Mount NFS Server Exported Volumes onto Client nodes
In order to enable state management for services running on the nomad client nodes, we first mount the exported NFS Server volumes onto the client nodes. We do this by updating the client nodes /etc/fstab file. Eg: The following /etc/fstab snippet will mount the exported volume from NFS_SERVER_IP(replace with your NFS Server IP or Hostname) to local client node mountpoint /html (make sure you have created the /html directory on client nodes beforehand)
sudo vi /etc/fstabadd the following line to mount from your NFS server to local /html
NFS_SERVER_IP:/xyz/html /html nfs4 rw,relatime,vers=4.2,hard,proto=tcp,timeo=600To Mount the NFS filesystem after editing the /etc/fstab file, run the following commands;
sudo systemctl daemon-reload
sudo mount /html- Edit /etc/nomad.d/client.hcl (same across all Nomad Server/Client Nodes)
datacenter = "My-Datacentre-Name"
data_dir = "/opt/nomad/data"- Edit/Create /etc/nomad.d/client.hcl
client {

 enabled = true

 host_volume "html" {
   path = "/html"
 }

 server_join {
  retry_join = ["SERVER_IP_1", "SERVER_IP_2", "SERVER_IP_3"]
  retry_max = 3
  retry_interval = "15s"
 }

}

plugin "docker" {
  config {
      allow_privileged = true
  }
}
We can now start the Nomad Service on the the client nodes so they can join the cluster.
 sudo systemctl enable nomad
 sudo systemctl start nomad
 sudo systemctl status nomad
Yeeha! The Cluster should now be up and running ready to accept jobs!
Submitting your Stateful Web App Service
An Nginx Web Server using Docker Engine with 3 allocations across 3 client nodes, with the html content persisting on the NFS Volume “/html” will be deployed. We can then see Consul’s super powers flourish, with Consul’s DNS, Load-Balancing, Fault Tolerance all coming into play without having to do the heavy lifting of installing other tools to perform these functions in our Hashicorp Nomad/Consul Cluster, keeping it clean, simple and easier to maintain/admin.
As we are not covering how we automate this process with CI/CD, below is a Nomad Job file we can paste into the Nomad Web UI to get it deployed onto our cluster we just built.
- Goto Nomad Web UI at http://server_ip:4646/ui
- Select Jobs from left side pane, and on the right click on “Run Job”
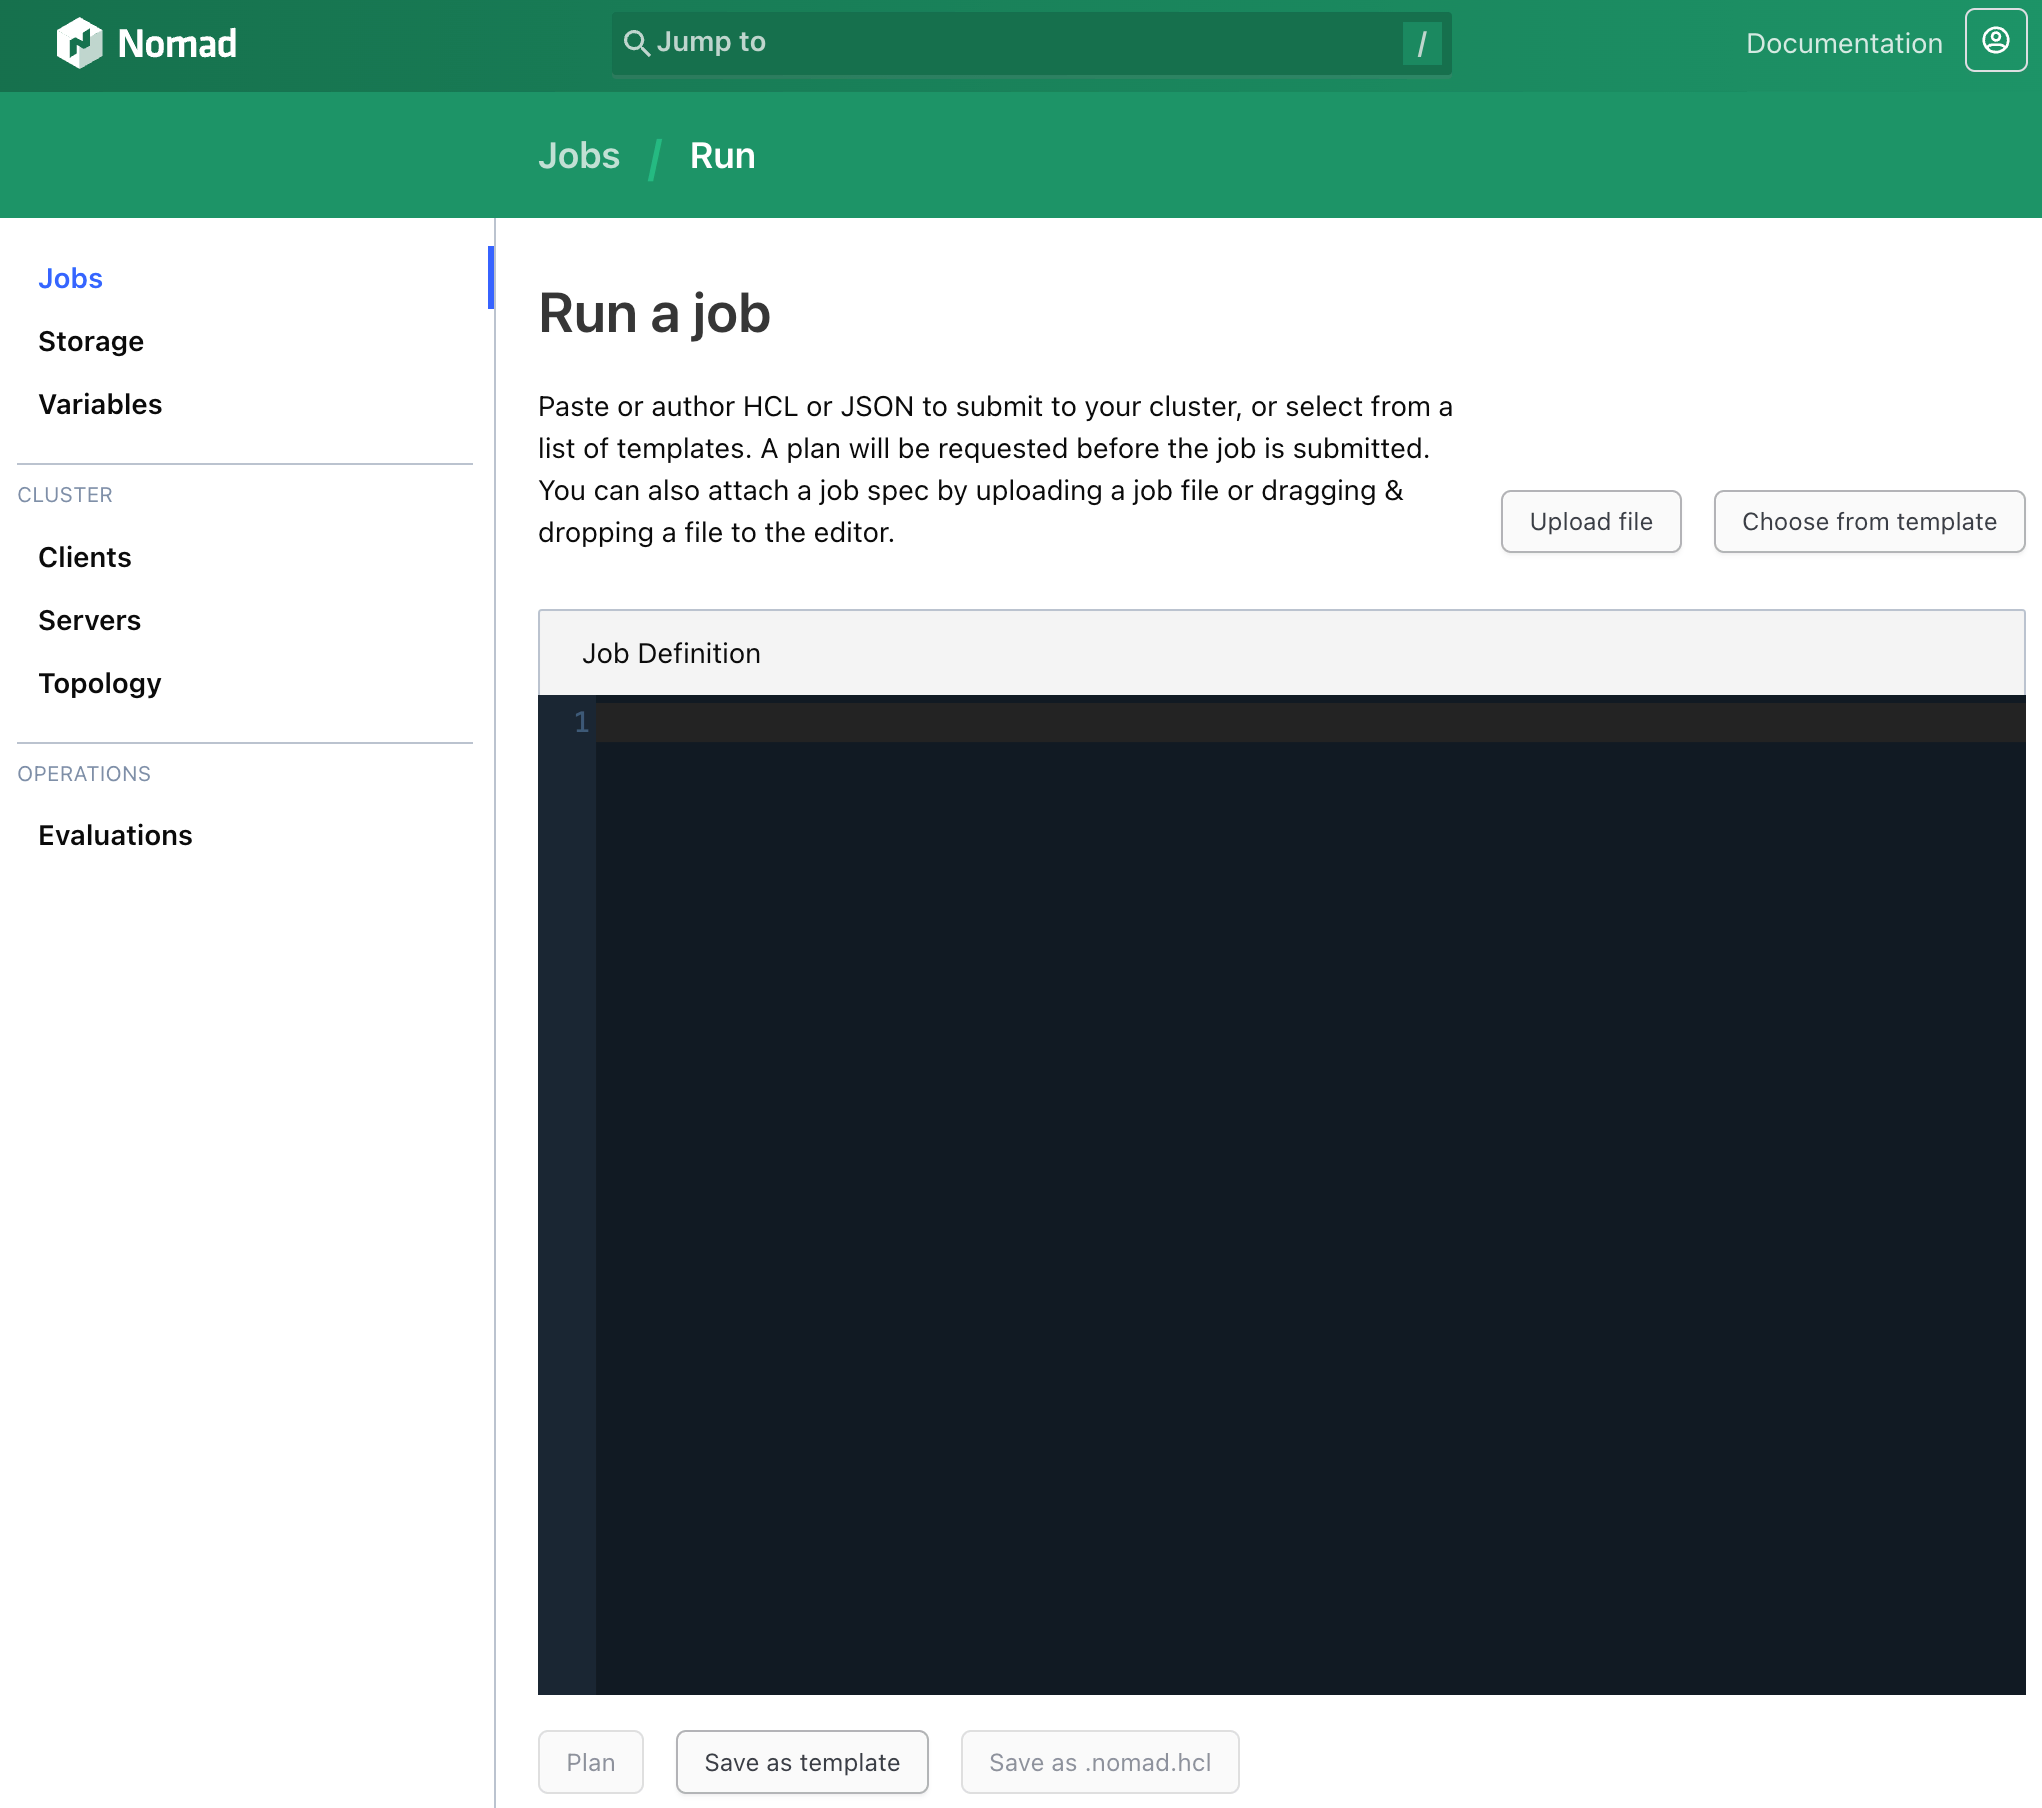
- Under Job Definition you should have a blank console looking page, where you can just copy/paste your Nomad Job file to.. You can use the following one to start with, remember to replace datacenters with whatever datacenter name you entered earlier on during the configuration of Nomad/Consul.
job "nginx-web" {
  datacenters = ["dc-name"]
  type = "service"

  group "web" {
    count = 3

    volume "html-nginx" {
        type = "host"
        read_only = false
        source = "html"
    }

    network {
      port "http" {
        to = 80
        static = 8080
      }
    }

    task "nginx-server" {
      driver = "docker"

      volume_mount {
        volume = "html-nginx"
        destination = "/usr/share/nginx/html"
        read_only = false
      }
      config {
        image = "nginx:1.27"
        ports = ["http"]
      }
    }

    service {
      name = "ng-web"
      port = 8080
    }

  }
}
A Brief breakdown of the nginx-web Nomad Job file components
- Group
- When using the group stanza to define how your job runs, if you opt to run the same job on more than 1 node for fault/failure tolerance, it will ensure that all tasks are run on the same physical node, meaning if we specficy a count of 3, we will get 3 Nginx servers deployed, 1 on each client node. If there were more than 1 task in the group, Nomad will ensure that all the group tasks are submitted on the one physical/virtual node, and with a count of 3, it will do this 3 times across 3 physical/virtual nodes.
- Volume (Stateful Config)
- Here is where we reference what volume we can mount into the Nginx job to serve the html content, so we don’t care what node or IP the new Nginx Web application starts on, it’s always going to restart with the same html content served from the NFS Server. Source (“html”) is the name of the volume we specficied in the Nomad Client configuration file /etc/nomad.d/client.hcl.
- Network
- We create a network port mapping called “http” which maps an external port 8080 to the containers internal port of 80(default Nginx port)
- If you want the port dynamically assigned, just drop the “static” option
- Task
- To run the job as Docker container, we specify “docker” as the driver
- To bind the NFS mounted volume:“html” into the container, we use “volume_mount” to reference which volume we want to use, and then the destination mountpoint(inside container) that it should bind the volume to.. In our case for Nginx, its default content serving dir is “/usr/share/nginx/html”
- Service - Consul Service Discovery
- This section is what adds the Nginx web app service into Consul’s service discovery catalog. Just by adding these few lines, we get to enjoy all the DNS, Loadbalancing, Fault Tolerance, ACL’s out of the box from Consul.
So How do we, as a user access the application just deployed?
Because we named the service “ng-web” (under job file “service” section), all we have to do, to access the web app is to enter the default DNS name that Consul DNS resolves: http://ng-web.service.consul:8080/
Any .consul domain-name lookup is forwarded by your local DNS resolver to the Consul Servers. Aha! but wait! where do we configure the DNS Resolver to forward .consul lookups to the Consul Server Cluster?
Hashicorp have wisely handed over the DNS resolver/forwarder responsibility to whatever your favourite DNS or local DNS tool is. For example, if I want to just use the MacOS local resolver, to test and prove that Consul DNS Service Discovery works, you can configure your MacOS DNS responder by following these steps.
- On you MacBook for example; Create a new resolver file /etc/resolver/consul
sudo vi /etc/resolver/consul- Add the following content into the consul file you have created/opened for editing
domain consul
search consul
nameserver Consul.Server.IP.1
nameserver Consul.Server.IP.2
port 8600
Remember to replace the Consul.Server.IP.1 with your actual IPv4 addresses of the Consul Servers.
- Restart Mac DNS Responder
sudo killall -HUP mDNSResponder- Verify configuration
scutil --dnsYou should get something like the following:
...
resolver #8
  domain   : consul
  search domain[0] : consul
  nameserver[0] : 192.168.144.12
  nameserver[0] : 192.168.144.13
  port     : 8600
  flags    : Request A records
  reach    : 0x00000002 (Reachable)
 ...
Hashicorp also provide documentation for other popular DNS Servers to assist in resolver/forwarder configs HERE
Enjoy your awesome highly available Hashicorp Cluster!