CDC Streaming Data from PostgreSQL DB Source to PostgreSQL DB Sink
Change Data Capture(CDC) is a commonly used method to migrate or replicate data from one database to another, which can be done in batches or in real-time for streaming data sources. There are many CDC tools and solutions out there, and I was specifically looking for a system that handles CDC with a Postgres Database as a source and due to the streaming nature of the data producer, I needed to monitor change events for every row-level insert, update, upsert and delete…. low and behold, Redpanda came to the rescue again. This pattern, commonly reffered to as an “Outbox pattern”, also opened up more options for downstream systems that can perform further processing and analytics, and be off the critical path, keeping your mission critical database and application away from experimental and curious data engineers.
The example I will demonstrate this CDC streaming solution with, is with the following data source/sinks;
- Source: PostgreSQL DB ingesting ISS Telemetry data
- Sink: PostgreSQL DB that Replicates source PostgreSQL DB in real-time
- Redpanda/Kafka Consumer: Redpanda Topic; Downstream Systems can consumes raw data events(json)
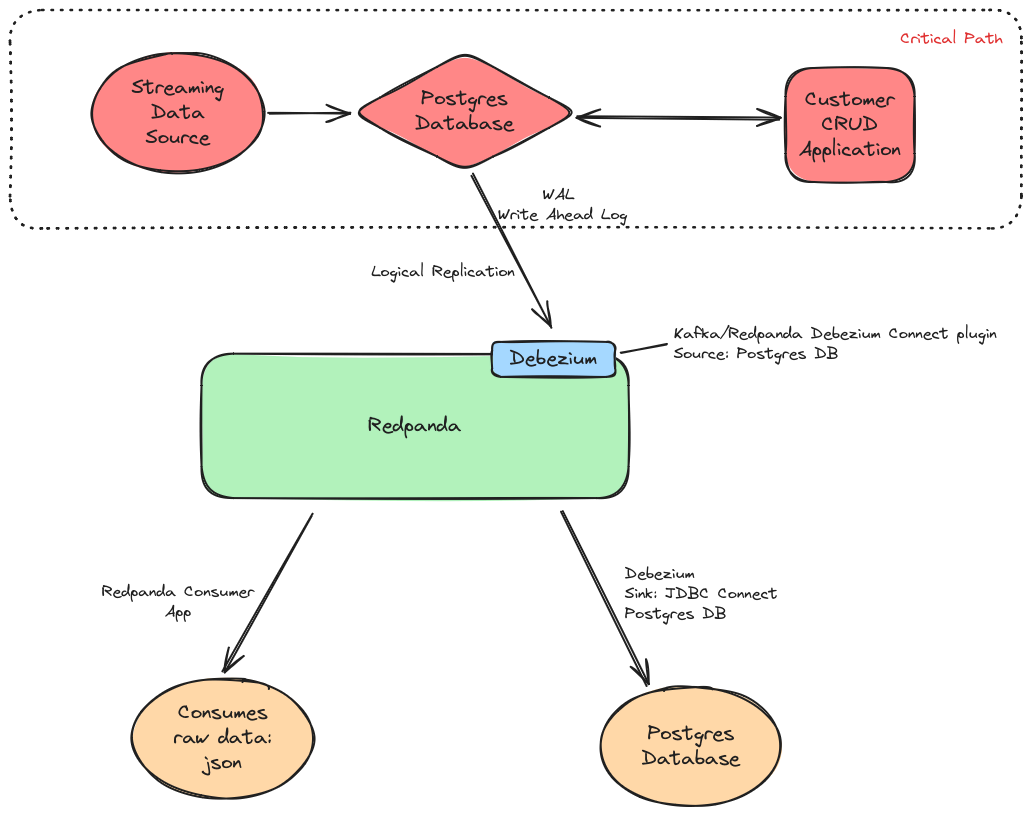
Here is the Data Flow Visual diagram of the deployment:
To spin up a test CDC deployment as per the above diagram in a dev environment, you will need the following;
- docker
- docker compose
- postgresql database source: docker or AWS cloud RDS Aurora(tested ok with Postgresql 14/15 serverlessV2). If you don’t have a postgresql database to import, you can use the sample ISS Photovoltaic telemetry data I have at the end of this article here.
- Redpanda: docker
- Redpanda Console(WebUI): docker
- Debezium: docker
- A glass of whisky
The solution that I ended up with was just an extension of a previous article I wrote about Redpanda and Memgraph Visualisations
CDC-Debezium-Redpanda
The top half of the diagram is what I refer to as the critical path of an existing analytics/anomaly-detection application, so in order to start capturing the row by row changes from the source Postgresql Database, we don’t have to make drastic changes to the application(software architecture) or the way data is ingested into the Postgresql Database within the critical path. The only config change we need to apply to the Postgresql Database is to enable Logical Replication with Postgres’ WAL(Write Ahead Log) and create a Postgresql Role with specific Replication permissions; Eg: PostgreSQL create replication role sql command:
CREATE ROLE <role_name> REPLICATION LOGIN;To enable Replication on a PostgreSQL Database with WAL, update/append the default PostgreSQL pgconfig.conf file with the following block;
# REPLICATION
wal_level = logical             # minimal, archive, hot_standby, or logical (change requires restart)
max_wal_senders = 4             # max number of walsender processes (change requires restart)
#wal_keep_segments = 4          # in logfile segments, 16MB each; 0 disables
#wal_sender_timeout = 60s       # in milliseconds; 0 disables
max_replication_slots = 4       # max number of replication slots (change requires restart)
Or, if you are using AWS RDS Aurora PostgreSQL(Serverless v2) you can use the following Terraform snippet;
resource "aws_rds_cluster_parameter_group" "default" {
  name        = "rds-aurora-cluster-pg"
  family      = "aurora-postgresql15"
  description = "RDS default cluster parameter group with Replication WAL Logical Enabled"

  parameter {
    name  = "rds.logical_replication"
    value = "1"
    apply_method = "pending-reboot"
  }
}
And then apply the cluster parameter group to the RDS Cluster;
resource "aws_rds_cluster" "this_postgresql" {
  ...
  db_cluster_parameter_group_name = aws_rds_cluster_parameter_group.default.name
  ...
}
OR, follow the Click-Ops Console AWS Documentation Using PostgreSQL Logical replication with Aurora;
Postgresql Replication with Debezium
Once we have logical replication enabled with WAL on the source Postgresql Database, we can then install the Debezium connect plugin into the Redpanda cluster. We also enable the Redpanda WebUI Console with the Debezium connect config which gives us some nice visibility and observability of the Debezium Source and Sink Connectors in action:

In our case we will be configuring Postgresql as a Source, and Postgresql as a Sink with the Debezium JDBC connector, and because we are going through the Redpanda brokers, we can deploy our own custom Redpanda consumer application to consume data from the Topics that Debezium is pushing the Postgresql(source) data to for other downstream applications.
Debezium currently have the following list of Source/Sink Connectors;
- MySQL
- MariaDB
- MongoDB
- PostgreSQL
- Oracle
- SQL Server
- Db2
- Cassandra
- Vitess
- Spanner
- Informix
- JDBC (Sink Connector to various DB’s; including Db2, MySQL, PostgreSQL, SQL Server and more)
Here is the config extract (docker compose) to enable Debezium Connect for the Redpanda WebUI Console;
connect:
	enabled: true
	clusters:
		- name: Debezium
		   url: http://connect:8083
Deploying Debezium with Docker/Docker Compose
Before setting up debezium connect service with your Hashicorp Nomad cluster, (or if you are time rich and like over-engineering; Kubernetes!). The following Docker Compose snippet deploys Debezium, Redpanda, and configures the Redpanda admin console with Debezium Connect;
  redpanda:
    image: docker.redpanda.com/redpandadata/redpanda:v23.2.22
    container_name: redpanda
    command:
      - redpanda
      - start
      - --kafka-addr internal://0.0.0.0:9092,external://0.0.0.0:19092
      - --advertise-kafka-addr internal://redpanda:9092,external://localhost:19092
      - --pandaproxy-addr internal://0.0.0.0:8082,external://0.0.0.0:18082
      - --advertise-pandaproxy-addr internal://redpanda:8082,external://localhost:18082
      - --schema-registry-addr internal://0.0.0.0:8081,external://0.0.0.0:18081
      - --rpc-addr redpanda:33145
      - --advertise-rpc-addr redpanda:33145
      - --smp 1
      - --memory 1G
      - --mode dev-container
      - --default-log-level=debug
    ports:
      - 18081:18081
      - 18082:18082
      - 19092:19092
      - 19644:9644
    networks:
      - redpanda

 rp-console:
    depends_on:
      - redpanda
      - connect
    image: docker.redpanda.com/redpandadata/console:v2.3.8
    container_name: rp-console
    entrypoint: /bin/sh
    command: -c 'echo "$$CONSOLE_CONFIG_FILE" > /tmp/config.yml; /app/console'
    environment:
      CONFIG_FILEPATH: /tmp/config.yml
      CONSOLE_CONFIG_FILE: |
        kafka:
          brokers: ["redpanda:9092"]
          schemaRegistry:
            enabled: true
            urls: ["http://redpanda:8081"]
        redpanda:
          adminApi:
            enabled: true
            urls: ["http://redpanda:9644"]
        connect:
          enabled: true
          clusters:
            - name: Debezium
              url: http://connect:8083
    ports:
      - 8090:8080
    networks:
      - redpanda

  connect:
    image: debezium/connect
    container_name: debezium-connect
    depends_on:
      - redpanda
    environment:
      BOOTSTRAP_SERVERS: "redpanda:9092"
      GROUP_ID: "1"
      CONFIG_STORAGE_TOPIC: "connect-config"
      OFFSET_STORAGE_TOPIC: "connect-offsets"
      STATUS_STORAGE_TOPIC: "connect-status"
      KEY_CONVERTER: "org.apache.kafka.connect.json.JsonConverter"
      VALUE_CONVERTER: "org.apache.kafka.connect.json.JsonConverter"
      INTERNAL_KEY_CONVERTER: "org.apache.kafka.connect.json.JsonConverter"
      INTERNAL_VALUE_CONVERTER: "org.apache.kafka.connect.json.JsonConverter"
    ports:
      - "8083:8083"
    networks:
      - redpanda
Start the services:
docker compose up redpanda rp-console connect postgresISS Photovoltaic Telemetry Postgresql DB Import sample
You can run the following sql script to create the iss database with 1 table to test out the CDC Debezium deployment:
create database iss;

\c iss;

create table iss_photovoltaic (
	id SERIAL PRIMARY KEY,
	pvcu_array_name VARCHAR(50),
	iss_array_position VARCHAR(50),
	pvcu_voltage VARCHAR(50),
	pvcu_current VARCHAR(50),
	rotation VARCHAR(50)
);

insert into iss_photovoltaic (id, pvcu_array_name, iss_array_position, pvcu_voltage, pvcu_current, rotation) values (1, 'Solar Array 2A', 'Port', '312.03 V', '0 A', '145.7 deg');
insert into iss_photovoltaic (id, pvcu_array_name, iss_array_position, pvcu_voltage, pvcu_current, rotation) values (2, 'Solar Array 2B', 'Port', '160.37 V', '0 A', '168.9 deg');
insert into iss_photovoltaic (id, pvcu_array_name, iss_array_position, pvcu_voltage, pvcu_current, rotation) values (3, 'Solar Array 4A', 'Port', '160.27 V', '0 A', '212.9 deg');
insert into iss_photovoltaic (id, pvcu_array_name, iss_array_position, pvcu_voltage, pvcu_current, rotation) values (4, 'Solar Array 4B', 'Port', '160.47 V', '0 A', '147.9 deg');
insert into iss_photovoltaic (id, pvcu_array_name, iss_array_position, pvcu_voltage, pvcu_current, rotation) values (5, 'Solar Array 1A', 'Starboard', '160.63 V', '0 A', '32.2 deg');
insert into iss_photovoltaic (id, pvcu_array_name, iss_array_position, pvcu_voltage, pvcu_current, rotation) values (6, 'Solar Array 1B', 'Starboard', '160.58 V', '0 A', '327.7 deg');
insert into iss_photovoltaic (id, pvcu_array_name, iss_array_position, pvcu_voltage, pvcu_current, rotation) values (7, 'Solar Array 3A', 'Starboard', '160.17 V', '0 A', '327.9 deg');
insert into iss_photovoltaic (id, pvcu_array_name, iss_array_position, pvcu_voltage, pvcu_current, rotation) values (8, 'Solar Array 3B', 'Starboard', '160.73 V', '0 A', '32.4 deg');
insert into iss_photovoltaic (id, pvcu_array_name, iss_array_position, pvcu_voltage, pvcu_current, rotation) values (9, 'Solar Array 2A', 'Port', '321.07 V', '0 A', '146.7 deg');
insert into iss_photovoltaic (id, pvcu_array_name, iss_array_position, pvcu_voltage, pvcu_current, rotation) values (10, 'Solar Array 2B', 'Port', '165.50 V', '0 A', '165.9 deg');
insert into iss_photovoltaic (id, pvcu_array_name, iss_array_position, pvcu_voltage, pvcu_current, rotation) values (11, 'Solar Array 4A', 'Port', '161.27 V', '0 A', '214.9 deg');
insert into iss_photovoltaic (id, pvcu_array_name, iss_array_position, pvcu_voltage, pvcu_current, rotation) values (12, 'Solar Array 4B', 'Port', '160.47 V', '0 A', '146.9 deg');
Configure Debezium Connectors
Once Debezium has been deployed and is running, you can configure the Source and Sink connectors with the following curl commands;
Postgresql Source Debezium Connect Configuration to ISS Telemetry database:
curl -i -X POST -H "Accept:application/json" -H "Content-Type:application/json" http://localhost:8083/connectors/ -d @SOURCE_FILENAME.jsonSample SOURCE_FILENAME.json file:
{
  "name": "psql-connector",
  "config": {
    "connector.class": "io.debezium.connector.postgresql.PostgresConnector",
    "plugin.name": "pgoutput",
    "tasks.max": "1",
    "database.hostname": "postgres",
    "database.port": "5432",
    "database.user": "postgres",
    "database.password": "some_password or reference to a secure vault",
    "database.dbname": "iss",
    "topic.prefix": "dbz_pg",
    "table.include.list": "public.iss_photovoltaic"
  }
}
Postgresql Sink Debezium Connect Configuration that replicates data from source db to sink db using JDBC:
curl -i -X POST -H "Accept:application/json" -H "Content-Type:application/json" http://localhost:8083/connectors/ -d @SINK_FILENAME.jsonSample SINK_FILENAME.json file:
{
"name": "jdbc-connector",
"config": {
"connector.class": "io.debezium.connector.jdbc.JdbcSinkConnector",
"tasks.max": "1",
"connection.url": "jdbc:postgresql://<POSTGRESQL_HOST_IP>:<POSTGRESQL_PORT/iss",
"connection.username": "postgres",
"connection.password": "some_password or reference to a secure vault",
"insert.mode": "upsert",
"delete.enabled": "true",
"auto.create": "true",
"primary.key.fields": "id",
"primary.key.mode": "record_key",
"topics": "dbz_pg.public.iss_photovoltaic",
"schema.evolution": "basic"
}
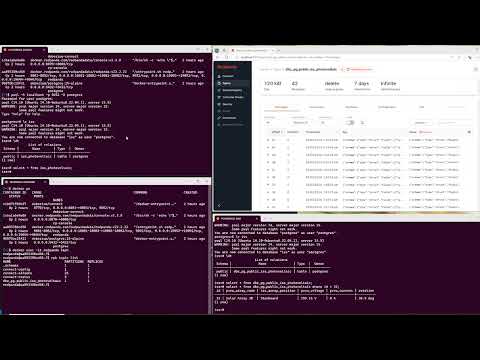
}A Video Demonstration of this Event Driven CDC Solution as documented in this blog article can be viewed at the following site: